
The ultimate guide to product photography: How to shoot photos that sell
How to
eBay
Jan 10, 2026
A complete guide for online sellers to capture professional, high-converting images using just a smartphone.
In today’s visual-driven marketplace, your product photos are your sales pitch. Whether you are a power seller on eBay, a vintage curator on Facebook, or a direct-to-consumer brand, buyers decide in seconds whether to click or scroll past.
Great photos do more than just show the item. They replace the physical experience of touching and testing the product. This guide combines professional photography principles with practical selling strategies to help you build trust, reduce returns, and sell faster.
Recommended watch: For a practical demonstration of these principles in a real home setup, check out this guide on eBay photography basics. It pairs perfectly with the steps below.
Phase 1: The setup & prep (before you shoot)
Most sellers skip this phase, but it is often the difference between a sale and a scroll.
Clean your product (the “reseller’s edge”)
High-definition smartphone cameras reveal everything—including dust and grime. A dirty product signals to buyers that the item hasn’t been cared for.
Wipe screens: Use a microfiber cloth to remove fingerprints from phones, tablets, or glossy plastics.
Clear ports: Use a soft brush or toothpick to remove lint from charging ports.
Remove residue: Clean off old sticker residue or pricing labels.
Polish hardware: Ensure metal buckles, jewelry, or zippers catch the light, not the dust.
Stabilize your camera
Blurry photos kill trust instantly. Even slight movement can make an image look “soft” and amateur.
Use a tripod: Even a cheap phone tripod ensures consistent framing.
The “T-Rex” arm: If shooting handheld, tuck your elbows tight against your ribs to stabilize your hands.
Phase 2: Mastering light (the physics of selling)
Lighting is the single most important factor in photography. Good light renders colors accurately and reveals texture, reducing customer questions and returns.
The golden rules of natural light
Avoid direct sun: Harsh, direct sunlight creates hard shadows and “blown out” highlights that hide detail.
Find a north-facing window (if possible): These windows provide soft, consistent, diffused light throughout the day.
Cloudy days are best: Cloud cover acts as a giant natural softbox, diffusing light evenly across your product.
The lighting checklist
Turn OFF overhead yellow lights (they clash with natural daylight and distort colors).
Position your table near a large window.
Use a white poster board or reflector opposite the window to bounce light back onto the shadowed side of the product.

Phase 3: The shot list (what buyers need to see)
Don’t just take a photo; tell a story. Buyers need to verify the condition and features of the item.
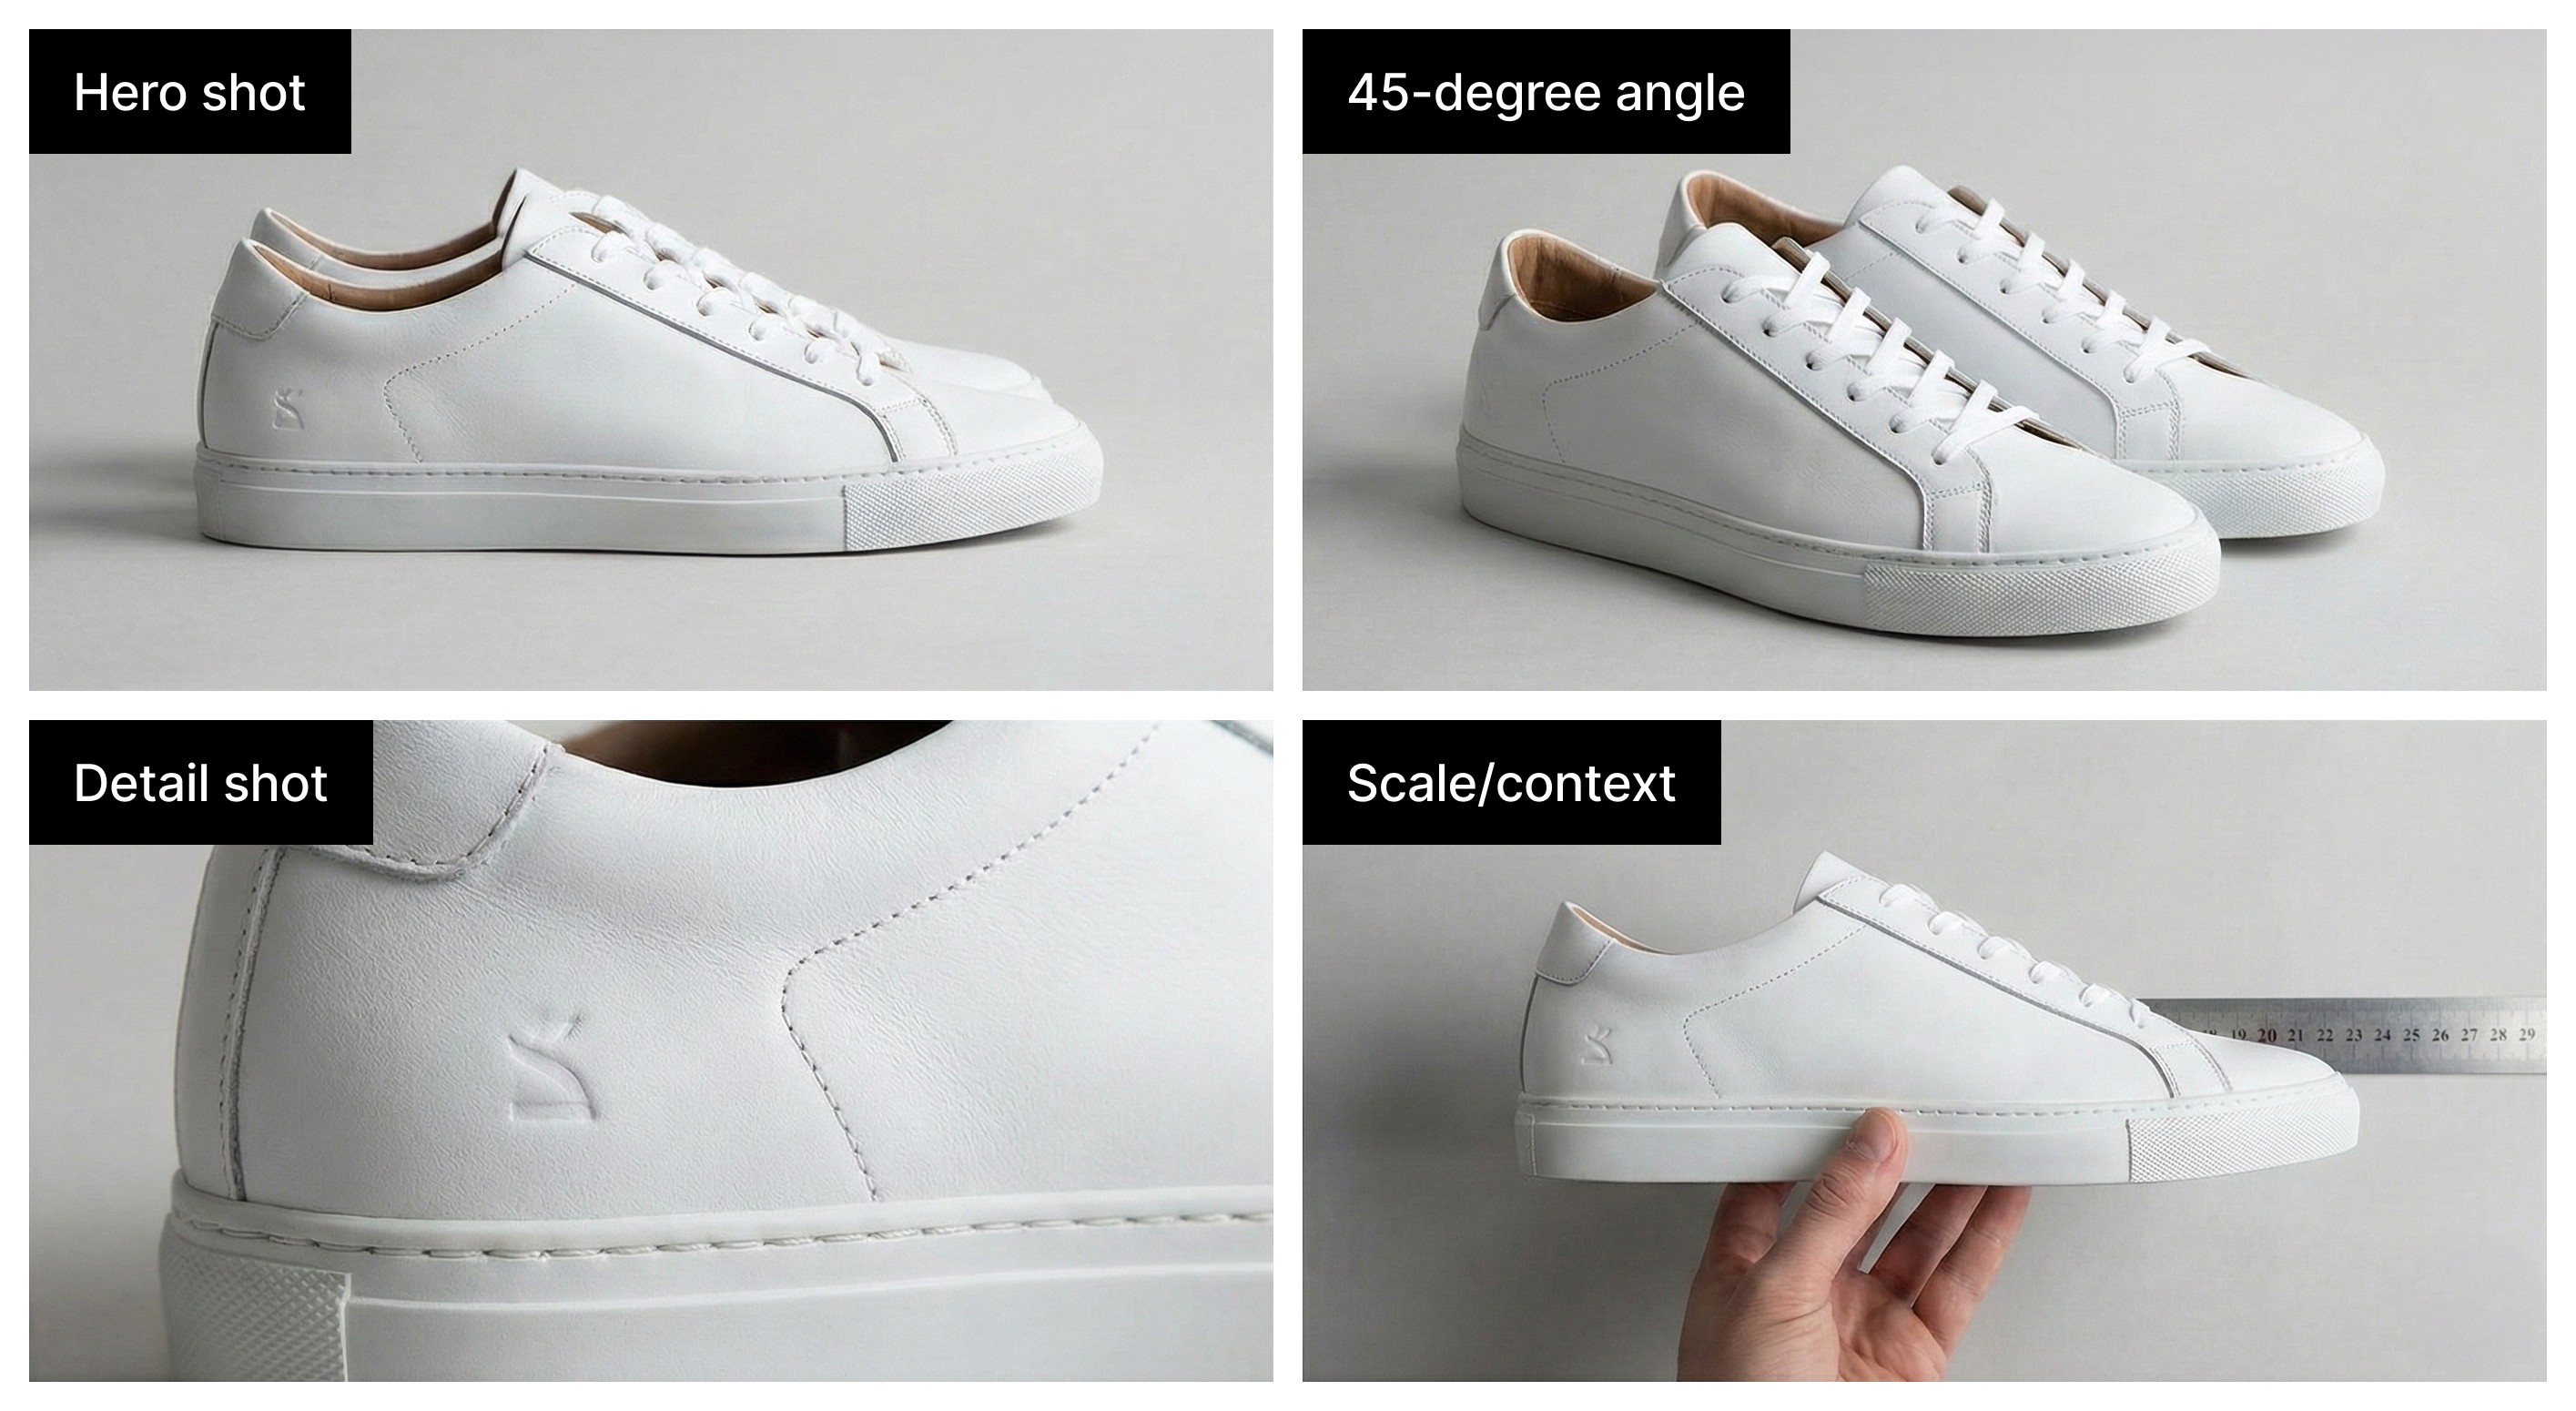
The “must-have” angles
The hero shot: Eye-level or slightly above, showing the entire product clearly.
The 45-degree angle: Best for 3D items (shoes, consoles, bags) to show depth and form.
The flat lay: Perfect for clothing or accessory collections, shot directly from overhead.
The flaw shot: Be honest. Close-ups of wear, scratches, or tears build immense trust and prevent returns.
The “proof of life” (for electronics & gear)
If it has a screen, lights, or moving parts, prove it works.
Screens on: Photograph laptops, phones, and consoles powered on to the home screen.
Lights active: Show power indicators or RGB lighting.
Scale reference: Use a hand, a coin, or a ruler to show size for items where scale is ambiguous (like jewelry or bags).
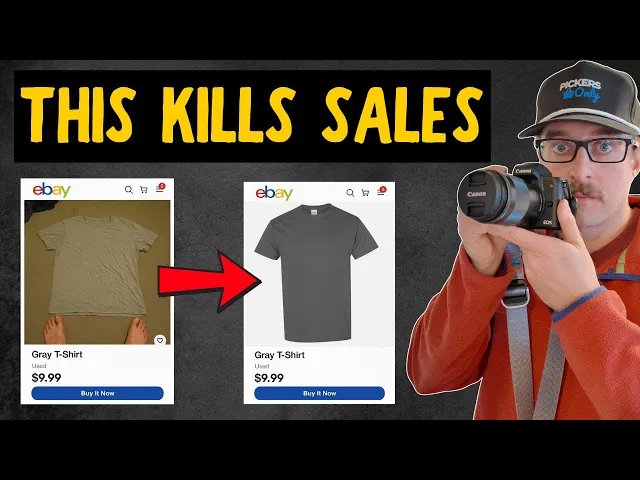
Phase 4: Backgrounds & environment
A cluttered background distracts the brain. You want the buyer’s cognitive load focused entirely on the item, not your living room carpet.
The psychology of neutral backgrounds
White or neutral backgrounds are the industry standard because they increase “processing fluency”—the ease with which a buyer understands what they are looking at.
White: The gold standard for professional e-commerce (eBay/Amazon/Google Shopping).
Light gray/cream: Excellent for vintage or aesthetic items where stark white feels too sterile.
Wood/texture: Acceptable for “rustic” items, but risks distraction.
Pro tip: You don’t need a studio. A white wall, a clean sheet, or a roll of paper works perfectly. For the fastest workflow, use software to fix it later.
Phase 5: Editing & workflow (speed vs. quality)
You don’t need Photoshop to get professional results. The goal of editing is accuracy, not art.
The 3-step edit
Crop & straighten: Remove empty space. Ensure the product is centered and vertical lines are actually vertical.
White balance: Fix any yellow or blue tints so the color on screen matches real life.
Exposure: Brighten the image slightly so details in the shadows are visible.
Automating the listing process
If you are listing multiple items a day, the workflow bottleneck isn’t just taking the photo—it’s writing the data about the photo. This is where AI tools save hours of work.
Hero Stuff connects your photography directly to your listing workflow. It uses your photo to automate the tedious data entry parts of selling:
Instant background removal: Automatically detects the product and places it on a clean white background.
AI title & description: Analyzes your image to identify the item and generates SEO-friendly titles and rich descriptions instantly.
Smart pricing: Suggests the optimal selling price based on the visual identification of your item.
Conclusion: Consistency is key
The difference between a hobby seller and a professional business is consistency. By adopting a standard workflow, cleaning, lighting, shooting, and processing, you create a brandable look for your store.
Summary checklist for every shoot:
✅ Clean the product (fingerprints off!).
✅ Light with soft, window light (no flash!).
✅ Shoot all angles + “screens on” proof.
✅ Edit for accuracy and clean backgrounds.
Start implementing these techniques today. Your photos will look better, your listings will rank higher, and your items will sell faster. Happy selling 🚀